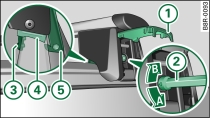
- Fig. 1 Roof railing: Attaching cross bar

- Fig. 2 Roof railing: Inserting cover profile into cross bar

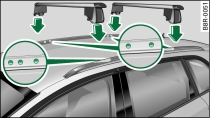
- Fig. 3 Attachment points for roof carrier cross bars
The roof carrier set consists of the front and rear cross bar, a cover profile and a torque wrench.
Attaching cross bars
Open the cap -1- Fig. 1.
Before positioning the cross bar, loosen the bolt on either side with the torque wrench -2- in the direction -A- until you feel resistance.
Clean the roof railing around the attachment points and the rubber pads -4- on the cross bars thoroughly Fig. 1.
Carefully position the cross bar on the roof railing in the area of the holes Fig. 3.
Insert the pins -3- in the holes. The claw fastener -5- must engage in the rim of the roof railing.
Make sure the rubber pad -4- is positioned flush on the roof railing.
Tighten the bolts on both sides using the torque wrench -2- in the direction -B-.
You have tightened the bolts to the necessary torque (6 Nm) when the two arrows on the torque wrench point to each other exactly.
Repeat these steps to attach the second cross bar.
Attaching additional elements
To attach additional elements on the cross bars, pull off the cap -6- Fig. 2.
Slide the elements into the T-section -7-.
Secure the elements according to the assembly instructions supplied with the elements.
Push the cap back in.
Inserting cover profile
Seal the open parts of the T-section -7- using the cover profile -8- after attaching additional elements Fig. 2.
If you do not wish to use any additional elements, seal the entire T-section -7- with the cover profile -8-.
If necessary, the cover profile can be cut to the required length.
WARNING!
All bolts and other connections of the roof carrier system must be checked and tightened if necessary before every journey; in addition, they should generally be checked at regular intervals. Under certain conditions, e.g. when driving on unsurfaced roads, it is necessary to check the connections more frequently. Otherwise the roof carrier or additional elements can become loose and fall off - risk of accident!
Caution!
When tightening the bolts, make sure that the pins and claw fasteners engage correctly in the holes and the rims of the roof railings.
Note
If necessary, the width of the cross bars can be adjusted via the bolts on the top of the cross bars using a hexagon key. You should have the adjustment performed by an Audi dealer or qualified workshop.
All images, logos and text are property of © Audi. This site has no relationship with the company Volkswagen - Audi Spain nor any of its affiliates worldwide. For more information.